How to expose a WebFinger web server with Unraid ?
What is WebFinger ?
WebFinger is a protocol used to discover information about people or other entities on the Internet, given an identifier like an email address or a URL.
For example, if you wanted to know more about an identifier like an email address [email protected] you can host a WebFinger endpoint to allow anyone to access more information. The endpoint would give you the name and surname of the user associated to the email address. Much more than names and surnames can be provided with WebFinger : public keys, blog addresses, openID endpoint...
Why do we need WebFinger ?
Let's say you have created an awesome website which requires users to log in. You don't want each user to create an account on your website because that would mean managing a database of accounts (with associated passwords), the logic behind authentication, password resets... It would also create some resistence from users You want your users to login in a user-friendly way. Making your website compatible with an SSO protocol seems like a good option but we need more information about the user to make it all work. That is where WebFinger comes in !
The process is the following :
- The user provides its identifier, e.g.
[email protected]. - Your website backend calls the WebFinger endpoint for the domain
example.com. This endpoint is standardized and is available at :https://example.com/.well-known/webfinger?resource=acct:[email protected]. Basically we request all the information publicly available about the user associated with[email protected]. - The WebFinger endpoint returns the following information :
{
  "subject": "acct:[email protected]",
  "aliases": [
    "https://example.com/users/john.doe"
  ],
  "properties": {
    "http://schema.org/givenName": "John",
    "http://schema.org/familyName": "Doe",
    "http://schema.org/image": "https://example.com/media/profile/john_doe.jpg"
  },
  "links": [
    {
      "rel": "http://openid.net/specs/connect/1.0/issuer",
      "href": "https://auth.example.com/"
    }
  ]
}
- Your website is now able to display a login page stating "Welcome John Doe, please login" with a personalized profile picture available at the link given by the properties :
https://example.com/media/profile/john_doe.jpg. - Your website is also able to redirect a user to its authentication page using its OpenID connector available at
auth.example.com.
Any practical use ?
Let's say I want to integrate Tailscale into my home-lab but without relying on Tailscale home-made authentication. I want to manage my own user-base and associated authentication mechanisms using my OpenID connector.
Tailscale blog is pretty clear on what we need to do :
The WebFinger endpoint must be served at https://${domain}/.well-known/webfinger and must include the issuer URL within the JRD in the response :{
"subject": "acct:${email}",
"links": [
{
"rel": "http://openid.net/specs/connect/1.0/issuer",
"href": "${issuer URL}"
}
]
}Let's host our own WebFinger endpoint using Unraid !
I will be using the WebFinger server implementation in Go provided by Maronato on GitHub : https://github.com/Maronato/go-finger. This implementation is recommended by the WebFinger official website : https://webfinger.net/code/.
Step 1 : Clone the repository to your PC
I first created a folder /WebFinger on my PC to hold the entire project.
Clone the repo inside the folder : /WebFinger/go-finger/...
Step 2 : Create a Docker Image
Use the Dockerfile provided and build the image. In my case, I'm using VSCode.
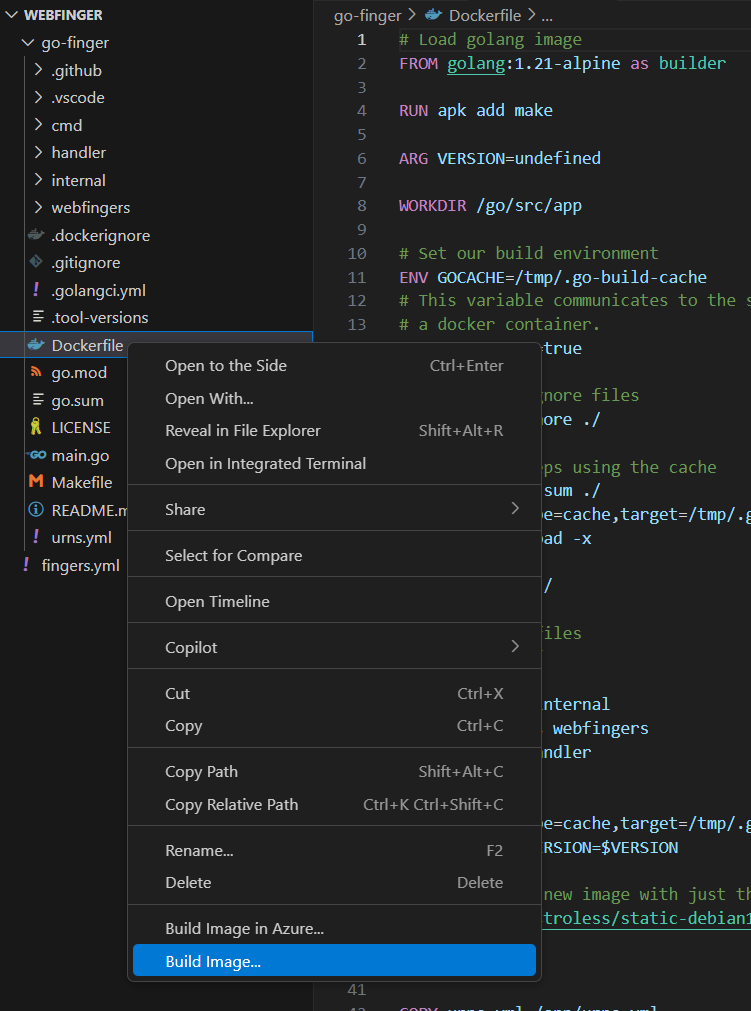
I tagged my image as webfinger:latest but you can name it however you like.
Step 3 : Publish your Docker Image to Docker Hub
I use Docker:Desktop to push the image to DockerHub (you need an account for this).

Step 4 : Configure the .yaml file
Create a file called fingers.yml. This is required by the project documentation : https://github.com/Maronato/go-finger/tree/v1.2.1#usage. For my purpose :
[email protected]:
  # If the value is a URI, it'll be exposed as a webfinger link
  openid: "https://auth.example.com/"
Step 5 : Start the Docker Container on your Unraid Server
Launch the docker container on your Unraid Server :
Click on Add Container at the very bottom of the Docker tab. Create the following template manually :
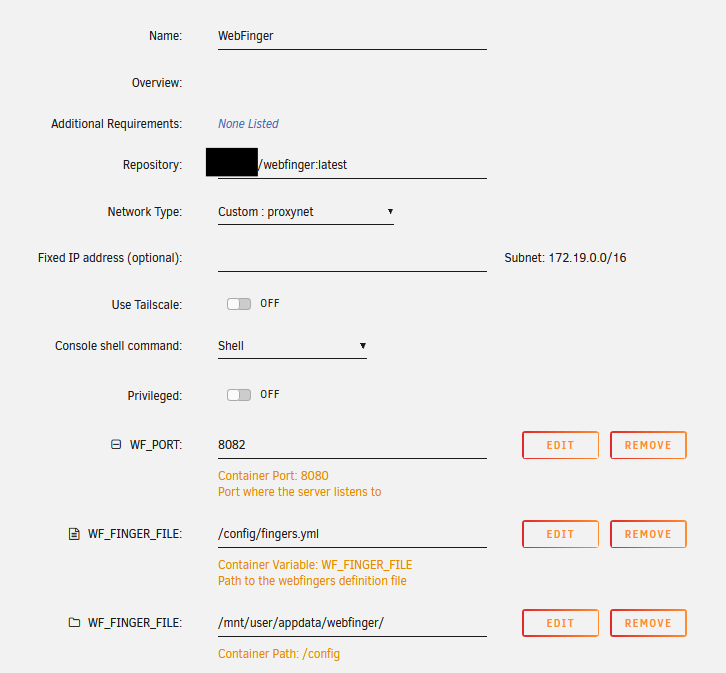
Within the folder /appdata/webfinger/, upload the .yaml file created at step 4. Now the docker container should start and we should be able to resolve a webfinger request locally using the URL :
http://localhost:8082/.well-known/webfinger?resource=acct:[email protected]
You should receive something like this :
{
"subject":"acct:[email protected]",
"links":
  [{
    "rel":"http://openid.net/specs/connect/1.0/issuer",
    "href":"https://auth.example.com/"
  }]
}
Step 6 : Expose the container to the internet
I won't go into the details of exposing ports and configuring your DNS as you can find other blog post. Here is a vague list of things you should do :
- Create a DNS record for your base domain
example.com. - Configure a dynamic DNS if your ISP has dynamic IPs setup.
- Push a hole though your firewall for HTTPS port 443 (hope you know what you are doing).
- Reverse proxy your docker container endpoint, in my case to port 8082. Your reverse proxy configuration should be something like this if you use Caddy, I personnaly added a few things to improve logging, HTTPS redirection, security headers while also hosting other things on my main domain :
(logging_policy) { # Can be used with "import logging_policy karakeep" or "import logging_policy jellyfin"
    log {
        output file /logs/{args[0]}.log {
            roll_size 50MiB
            roll_keep 5
            roll_keep_for 100d
        }
        format json
        level INFO
    }
}

(security-headers) {
	header {
		# Enable HSTS
		Strict-Transport-Security "max-age=31536000; ;includeSubDomains; preload"

		# Disable clients from sniffing the media type
		X-Content-Type-Options nosniff

		# Clickjacking protection
		X-Frame-Options SAMEORIGIN
	}
}

(redir-https) {
	# Force HTTPS
	@is_http {
		protocol http
	}
	redir @is_http https://{host}{uri}
}

example.com {
	import logging_policy examplecom
	import security-headers
	import redir-https

	#If it matches it does not evaluate the second handle https://caddyserver.com/docs/caddyfile/directives/handle
	@is_webfinger path /.well-known/webfinger

    handle @is_webfinger {
        #WebFinger
        reverse_proxy localhost:8082
    }

    handle {
        #Else, redirect to subdomain or reverse proxy to another other container running on lets say 7777
        #redir https://blog.example.com{uri} permanent
        #reverse_proxy localhost:7777
    }

}
You can now check it's working properly by testing it directly from the webfinger website : https://webfinger.net.
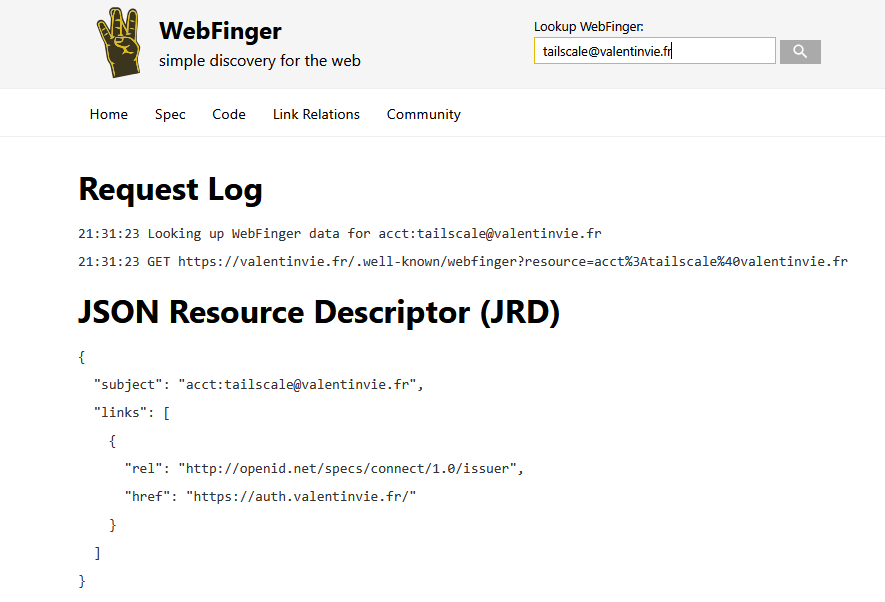
Yay ! It works 😄